
Workspace and team setup
Name your workspace, switch between workspaces, invite teammates, pick the right role, set module permissions, transfer ownership and remove access.
This guide shows you how to set up your workspace details, add your team, and control what each person can see and change. It's for workspace owners and admins. If you're a teammate who's been invited, see Accept an invitation.
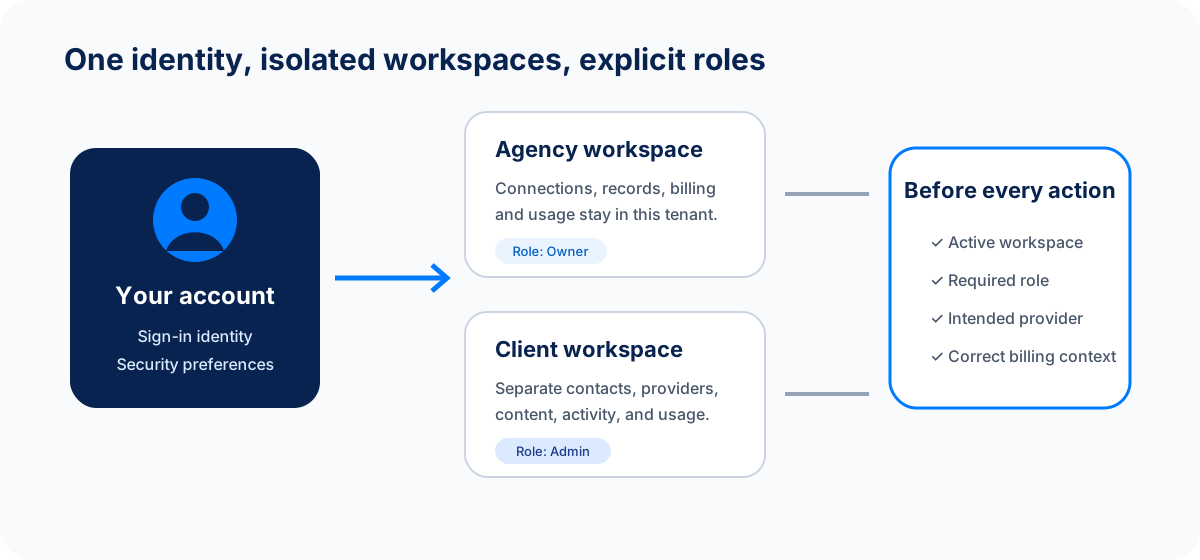
Your account is who you are. The workspace you have open decides which contacts, messages, connected accounts, settings and billing you're working with.
Before you begin
- Role: only the workspace Owner and Admins can invite people, change roles and set permissions. Editors and Viewers can see the member list but not change it.
- Plan: the number of users and workspaces you can have depends on your plan. For example, Pro includes up to ten workspaces. Check Settings → Billing for your limits.
- Teammates' work emails: invite each person with the email address they'll sign in with.
Check which workspace you're in
Your current workspace name is shown at the top of the left sidebar. Select it to open the workspace switcher, where you can:
- Search for and switch to another workspace.
- See Pending Invitations waiting for you.
- Select Add Workspace to create a new one (if your plan allows more).
Always check the name before you import contacts, connect an account (like Gmail or a phone number), publish a page, switch on an automation or change billing. Everything you do happens in the workspace shown.
If you try to create a workspace beyond your plan's limit, you'll see a message with an Upgrade button that takes you to Settings → Billing.
Set up your workspace details
- Go to Settings → Workspace. You'll see four tabs: General, Members, Invitations and Permissions.
- On General, under Workspace Information, set the Workspace Name (your business name works well) and an optional Description.
- Under Logo (optional), select Upload image and choose a JPEG, PNG, WebP or GIF file.
- Select Save Changes.
What you should see: Workspace updated successfully, and the new name at the top of the sidebar.
Your personal details live elsewhere. Go to Settings → General to change your name, display language, time zone, appearance and sign-in security (such as passkeys). See profile, preferences and security.
Invite a teammate
- Check the workspace switcher shows the workspace the teammate should join.
- Go to Settings → Workspace → Members and select Invite Member.
- In Invite Team Member, enter their Email Address.
- Choose a Role (see the table below).
- Select Send Invitation.
What you should see: Invitation sent to followed by their email. The invitation appears on the Invitations tab under Pending Invitations until they accept.
Ask your teammate to accept it and check they can see the right workspace before they start work.
Which role should I choose?
Pick the lowest role that lets the person do their job. You can change it later.
| Role | Can do | Good for |
|---|---|---|
| Viewer | View workspace content | Someone who reviews reports or checks work |
| Editor | Create and edit workspace content | Sales reps, support agents, marketers, builders |
| Admin | Everything an Editor can, plus manage members and settings | Team leads who run the workspace day to day |
| Owner | Full control, including billing | One person per workspace. You can't invite someone as Owner; see transfer ownership |
Client workspaces run by an agency use slightly different roles. See roles and permissions.
Resend or cancel an invitation
On the Invitations tab, use the menu on the invitation to Resend invitation or Delete invitation. Resend the existing invitation rather than creating a new one.
Fine-tune access with permission groups
Roles apply to the whole workspace. If you want some people to have different access to specific modules (for example, sales can edit the CRM but only view Reports), use permission groups.
- Go to Settings → Workspace → Permissions.
- If you have no groups yet, select Add starter groups to add a ready-made set, or select New group to build your own.
- For each module, choose the access level the group should have, such as No access, view, edit or manage.
- Save the group, then add people to it.
A group overrides a person's role for the modules it names. You can also set access for one person individually, and see their Effective access, which is what they can actually do after roles, groups and individual settings are combined.
Change a member's role
- Go to Settings → Workspace → Members.
- Open the menu next to the person and choose Change to Admin, Change to Editor or Change to Viewer.
You can't change your own role or the owner's role.
Transfer ownership
The owner controls billing. To hand the workspace to someone else:
- Make sure they're already a member. Invite them first if needed.
- On Members, open the menu next to their name and choose Transfer Ownership.
- Select Send Ownership Transfer.
Ownership and billing only move when they accept. Until then, you stay the owner and the member list shows Ownership transfer pending. You can cancel it any time before they accept. When they accept, you become an Admin.
Remove someone
Before you remove a teammate, reassign their open leads, deals, tasks, conversations and automations. Also check that shared connections (like the team inbox or social pages) weren't connected with their personal account.
Then, on Members, open the menu next to their name and choose Remove, then confirm. They lose access to this workspace.
To leave a workspace yourself, go to Settings → Workspace → General and, under Danger Zone, select Leave Workspace.
Delete a workspace or your account
Owners can delete a workspace from Settings → Workspace → General → Danger Zone with Delete Workspace. This can't be undone.
To close your whole account, select Review account deletion in the same place, or go to Settings → General → Account management. Spacebrain lists each workspace you own and asks you to delete it or transfer it to someone else first. Your default workspace is deleted with your account. Client workspaces managed by an agency are handled by the agency.
Worked example
Sam owns a three-person design studio.
- Sam stays Owner and handles billing.
- Priya runs projects day to day, so Sam invites her as Admin.
- Leo handles leads and replies to clients, so he's an Editor.
- Their accountant only needs to see reports, so she's a Viewer.
- Sam adds starter permission groups so Leo can't change automations, then checks Leo's Effective access.
If something goes wrong
| What you see | What to do |
|---|---|
| Invite Member or the Invitations tab is greyed out | Only owners and admins can manage invitations. Ask one of them. |
| is already a member of this workspace | They're already in. Check the Members tab. |
| An invitation is already pending for this email | Resend the existing invitation from the Invitations tab. |
| The teammate never got the email | Check the address, ask them to look in spam, then resend. Don't forward your own link. |
| This workspace is inactive. Please subscribe to access it. | The workspace's subscription has lapsed. The owner can fix this in Settings → Billing. |
FAQ
How many admins should we have?
At least two, so someone can help if the owner is away. Don't make everyone an admin; give it only to people who manage the team or settings.
Can one person belong to several workspaces?
Yes. They use one account and switch between workspaces from the top of the sidebar. Each workspace keeps its own data, roles and billing.
Should I connect our email or social accounts with my personal login?
Use a shared business account where you can. If a connection belongs to someone who leaves, it can stop working when their account is closed.
Next step
Next step
Keep moving
Open the relevant Spacebrain screen or contact support if you need help.
Last updated on
Move from another CRM
Bring contacts, companies and leads from GoHighLevel, HubSpot or any CRM export into Spacebrain, check the results and switch over safely.
Launch your first automation safely
Plan, test with yourself, launch to a small group and improve. A simple four-step routine for automations, AI agents, emails, forms and pages.