
Create, Publish, and Analyze Forms
Build a Spacebrain form, connect it to your CRM, style it, publish and embed it, send responses to other tools and read your results.
Spacebrain Forms let you collect information one question at a time, such as contact requests, quote requests or feedback, and send each response straight into your CRM. This guide takes you from a new form to a published, embedded form and shows you how to read the results. It's for anyone who builds or looks after forms.
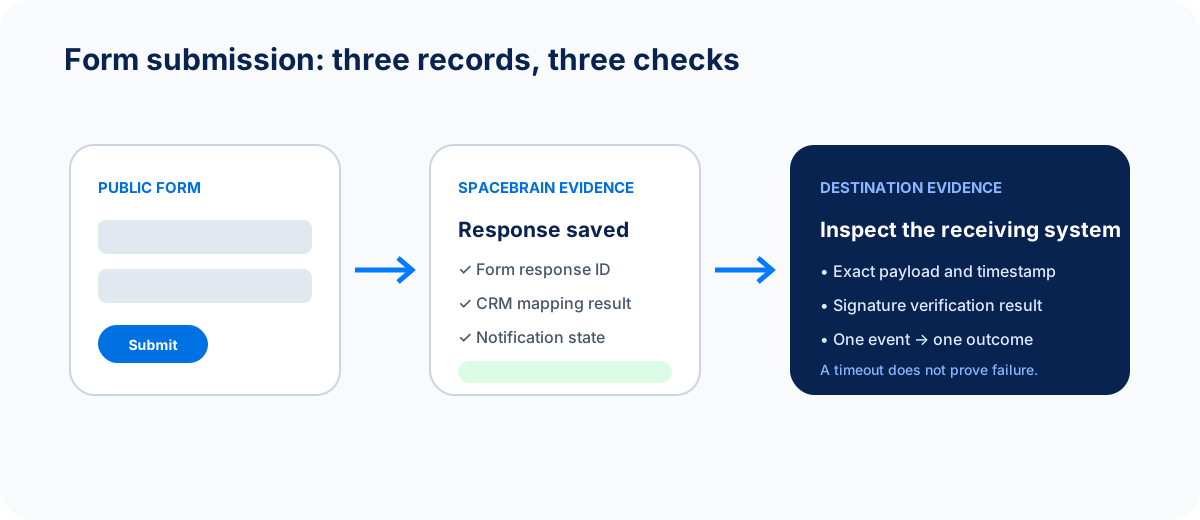
Check each stage on its own: the published form, the response, the CRM record, notifications and connected tools. A CRM problem isn't the same as a publishing problem.
Before you begin
- Permission: you need editing permission to create or change forms. Viewers can open forms and responses but can't change them.
- Know the outcome: decide what the form is for and what should happen after someone submits it. Ask only for what you need.
- To create CRM leads: include an Email or Phone question so Spacebrain can match or create the lead.
- Plan: custom URL names and link previews are included on Starter plans and above. Some email notification options need a paid plan.
Where to find Forms
Open Sites → Forms. The list shows every form in the workspace with its status: Draft, Published or Archived. You can:
- Filter by status (All, Draft, Published, Archived) and search by name or description.
- Organize forms into folders. All forms shows everything, and Unfiled shows forms that aren't in a folder. Deleting a folder doesn't delete its forms; they move to Unfiled.
- Use a form's More actions menu to Share form, Get embed code, Copy public link, Move to folder, Publish, Unpublish, Archive, Restore or Delete form.
Create a form
- Open Sites → Forms and select Create form. You can also select Start with a template or Create with AI.
- Under What is this form for?, choose a goal. Optionally pick your industry under And who is it for?, or select Not sure yet — show me everything.
- Under How should it look?, choose a style, or Keep template design.
- Under What are you asking for?, choose a template.
- On Ready to create, check your choices, enter the Form name and select Create my form.
To skip the wizard, select Start blank for an empty form, or Generate with AI to describe the form you want.
Build with Forms AI
Create with AI, or Forms AI in the builder, drafts a form or suggests changes for you.
- Describe what you want under What would you like this form to achieve?
- Select Review credit cost. Asking for a quote is free.
- Select Confirm and generate.
- Review the suggested changes and the preview, then apply them.
Forms AI only changes your draft. It never publishes. If it can't create a valid proposal, no credits are charged.
Find your way around the builder
- Left, Blocks: the list of blocks. Select Add block or the + between blocks to add one. Use Move up, Move down and Remove block to reorder.
- Centre, canvas: a live preview of the selected block. Use Previous and Next to step through.
- Right, inspector: switch between Form (settings for the whole form) and Block (settings for the selected block). On medium screens, open it with Open form settings. On a phone, use the Blocks, Canvas and Settings tabs.
- Header: the status chip, save status, Undo and Redo, Forms AI, Logic, device preview, Conversions, Preview, Share, Publish and a menu with Responses, Analytics, Version history, Unpublish and Archive.
Your changes save automatically. The save status shows Saved, Unsaved, Saving… or Save failed.
Add questions
Select Add block and choose:
- Content: Welcome, Statement, Thank you.
- Questions: Short text, Long text, Email, Phone, Number, Single choice, Multiple choice, Yes / No, Rating, File upload.
A form can have one Welcome block and one Thank you block. For each question, write a short, clear label and set it in the Block tab:
- Required, if the person must answer.
- Limits, such as Min length and Max length, Minimum and Maximum, Min choices and Max choices, the rating scale (Starts at, Ends at) or Maximum files.
- Choices for choice questions (select Add choice).
Connect the form to your CRM
- Select Form in the inspector.
- Under CRM table, choose where responses go:
- Not connected: responses stay in Forms only.
- Leads: each submission creates or updates a lead from the mapped questions.
- A custom table: each submission adds a row, with the mapped questions as columns.
- Select a question, open the Block tab and choose its CRM mapping. For Leads, you can map to first name, last name, email, phone, company or your custom lead fields. Each field can be mapped once.
- For Leads, map an Email or Phone question so Spacebrain can link or create the lead.
- Publish, submit a test response and check its CRM status in Responses.
Changing the CRM table clears existing mappings, so choose the table before you map questions.
Add logic and endings
Select Logic to open Conditional logic.
- Select Add rule and give it a Rule name.
- Add conditions: choose a Question, a Condition (such as is, contains, is greater than or is answered) and an Answer or Value. Choose whether all or any conditions must be true.
- Under Then, choose an Action: Go to, Show, Hide, Skip, Make required, Make optional, Disqualify respondent or Show custom ending.
- Add endings under Custom endings if you need different thank-you messages.
- Open Flow map to see the paths, and select Test path to try them.
Example: if "What do you need?" is "A quote", Go to "Project budget". Otherwise the form continues to the next question.
Style the form
In the Form tab:
- Form theme: choose a style, and set the Background and Text colours. Reset to Spacebrain defaults undoes your changes.
- Button style: set the Button color. It colours your buttons, selected answers and the progress bar, and the button text adjusts automatically so it stays readable. Choose Square, Rounded or Pill. The sample button on the canvas shows your colour straight away. Enter colours as hex, for example #1F6FEB.
- Advanced design: Font, Spacing, Text scale, Content width and Custom CSS. Custom CSS only affects this form; external links, imports and page-wide styles are blocked.
- Use workspace branding and Show progress bar.
If a colour is hard to read, the panel shows a contrast warning. Aim for at least 3:1 for buttons.
Set up notifications
In the Form tab:
- Capture unfinished responses: keeps answers from people who start but don't submit.
- Notify this email: alerts someone when a response comes in. On the Free plan this is the verified workspace owner. Paid plans can use another address.
- Email the respondent: sends the person a message. Choose the Respondent email question and write the Subject and Message. If you have a connected, verified sending account, choose it under Send from. Otherwise it uses Spacebrain default.
Test the respondent email before you promise one on the form. Keep marketing consent separate from the details you need to answer the request.
Take a payment after submission
If you use Payments, select the Thank you block and choose a payment link under Payment after submission. Pick a Collection mode: an optional payment link, or required payment where your workspace supports it. Set the Payment button label. Products and prices stay managed in Payments. A form with payment needs a required Email question before you can publish it.
Track conversions
Select Conversions in the header to add your Meta Pixel and choose which actions count as conversions. Select Apply to draft, then publish. See Track conversions with Meta Pixel.
Preview and publish
- Select Preview and complete the form as a respondent. Try required-field errors, every logic path and each ending, on desktop and mobile.
- Select Publish. The Review and publish Form window opens.
- Use Test draft and the Guided journey test. Fix anything marked Needs attention.
- Select Publish Form.
After the first publish, edits stay private. The save status shows Saved · not published, and a banner says the live form still shows the previous version. Select Publish new version when you're ready. Each response keeps the version the person completed.
Version history starts after the first publish. Restore to draft copies an old version into your draft; it doesn't publish it.
| Status | What it means |
|---|---|
| Draft | Private and editable. A reserved link isn't active yet. |
| Published | The public link and embed accept responses. |
| Archived | Read-only and not public. Responses are kept. Restore returns it to a private draft. |
Unpublish returns a published form to a draft: the public link stops accepting responses, and responses are kept.
Share a link or embed
Select Share in the builder, or Share form from the list. The window has three tabs:
- Share link: copy the public URL. On Starter plans and above, you can set a memorable URL name. You can reserve it before publishing; it goes live when you publish.
- Embed: copy a responsive iframe to paste into any webpage.
- Link preview: set the Preview title, Preview description, Social image URL and Favicon URL shown when the link is shared (Starter and above).
The link and embed only accept responses while the form is published. Test the embed on your real page on desktop and mobile. Make sure the page doesn't cut it off or hide it behind a cookie banner that never loads.
To embed a form in a Spacebrain landing page or funnel, use its embed block instead. Only published forms can be embedded. See Landing pages and funnels.
Send responses to other tools
Open the form's Connect tab to send each completed response elsewhere. Under Add a connection, choose:
- Webhook: a signed JSON payload to your own HTTPS endpoint.
- Zapier: a Zapier Catch Hook URL.
- Slack: a summary through a Slack incoming webhook.
- Google Sheets: a deployed Google Apps Script web app that adds rows.
Enter the URL and select Connect. For a Webhook, copy the signing secret when it's shown (it's shown once) and select I saved it. Then open the destination's menu and choose Send test.
Each destination shows Active or Paused. Use Pause and Resume to stop and restart deliveries, Activity to see recent deliveries (Delivered, In progress or Needs attention), and Disconnect to remove it. A failed delivery never stops the form from collecting responses.
For custom Webhooks, see Verify Form webhook signatures.
Run an automation when the form is submitted
To tag a lead, create a task or send a follow-up, build an automation with the Form Submitted trigger and choose this form as the Source form in Setup. See Build an automation in the editor.
Review responses
Open Responses. You'll see how many responses were submitted, how many were Unfinished, and each response's version and CRM status:
| CRM status | Meaning |
|---|---|
| Synced | The lead or table row was created or updated. |
| Pending | Still being processed. |
| Needs review | Something needs a person to check it. |
| Failed | The CRM update didn't complete. Spacebrain retries automatically. |
| Not requested | The form isn't connected to a CRM table. |
Select a response to see its answers. Use Previous and Next (or the arrow keys) to move between responses, and Open CRM contact to jump to the lead. Search and the CRM filter only cover the responses on the current page.
Select Export CSV to download responses. Remove response takes a response out of the list and future exports. Export anything you need to keep first.
Read your analytics
Open Analytics. Filter by date range (Last 7 days, Last 30 days, Last 90 days), Version, Device and Display (Direct link or Embedded). You'll see Views, Starts, Submissions, Overall conversion, Abandonment and Average completion, a Conversion funnel, and Question-by-question drop-off to find where people give up.
- A view doesn't mean someone started.
- A start doesn't mean they submitted.
- A submission doesn't prove the CRM update or connected tools worked. Check Responses and Connect for that.
With fewer than 20 unique visitors, rates can swing a lot. Compare the raw numbers before you change anything.
Worked example: a quote request form
- Select Create form, choose a quote-request template and select Create my form.
- Keep Name, Email, Phone, What do you need? and Budget.
- In Form, set CRM table to Leads. Map Name, Email and Phone under CRM mapping.
- Turn on Notify this email for your sales inbox.
- Set your Button color to your brand colour.
- Preview, then publish and embed the form on your website.
- Build an automation: Form Submitted → Create Task "Send quote" for the lead's owner.
- Submit a test response. Check Responses shows Synced, the lead exists and the task was created.
If something goes wrong
| What you see | What to do |
|---|---|
| No CRM mapping option on a question | Choose a CRM table in the Form tab first. |
| A response shows Failed or Needs review | Check the mapped email or phone answer and the CRM table. Spacebrain retries failed updates automatically. |
| The link says it isn't accepting responses | Publish the form. Unpublished and archived forms don't accept responses. |
| Changes don't appear on the live form | Select Publish new version. |
| The embed doesn't show | Publish the form, then check the host page isn't blocking the iframe. |
| Send from is missing | Turn on Email the respondent and connect a verified sending account. |
More help: Forms publishing and CRM troubleshooting.
Pause, archive or delete safely
- Unpublish: a temporary stop. The link stops accepting responses; responses are kept.
- Archive: makes the form read-only and not public. Responses are kept.
- Delete form (from the Forms list only): permanently removes the form, turns off its link and embed, and its responses are no longer available in Forms. Export what you need and remove the embed from your sites first.
FAQ
Can I change a published form without affecting people filling it in?
Yes. Edits are saved to a draft. People keep seeing the published version until you select Publish new version.
Will two responses from the same email create two leads?
Spacebrain uses the mapped email or phone to link or create a lead. Don't rely on similar names being merged.
Where do uploaded files go?
Files uploaded through forms use your workspace storage. Editors can open Manage uploaded files on the Forms list to download or delete them.
Next step
Put your form on a page with Landing pages and funnels. To send respondent emails from your own domain, set up Email accounts.
Next step
Keep moving
Open the relevant Spacebrain screen or contact support if you need help.
Last updated on
Sites overview
Choose the right Sites tool - forms, landing pages, funnels, quizzes or webinars - and follow the same safe path from draft to published page.
Verify Form webhook signatures
For developers - store the Form webhook secret, check each request's signature, ignore repeated deliveries, respond quickly and handle retries safely.